
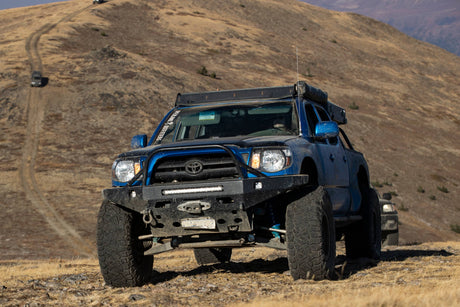
The internet is a crazy place full of all sorts of different people with different ideas and experiences. So when you jump on the internet to see how hard or easy it is to clear 35” tires on your Tacoma, it’s very difficult to find a reliable answer. One person will tell you they installed them and never rub and didn’t have to do anything, and the next person will tell you that it’s impossible to fit them, so don’t even try.
I’m here to set the record straight. After installing many many sets of 35” tires on Tacoma’s over the years, as well as even larger tires up to 40” so far, I feel qualified to talk about this topic with real experience.
One thing that I’ve discovered is that most people have different opinions on what “full clearance” means. This even includes different companies and shops claiming that their “kit” will let you clear 35’s if it’s installed, when, in fact, it’s just one small piece in the puzzle. I’m going to start off with what I consider to be the 3 “levels” of clearance for any size tire larger than stock, not just 35’s:
Street Clearance
This means that you can run these tires on the street, and have no rubbing until you hit a big enough speed bump or curb, but at normal ride height, the tire clears through the entire steering angle from lock to lock.
Dirt Road Clearance
This means you can take your truck off the pavement and start hitting regular dirt access roads with potholes, bumps, dips, and mild obstacles. Your tires will clear through around 85% of the available suspension travel with full steering input in either direction. However, if you hit a big enough G-out or bump, you will still rub somewhere.
Full Clearance
This is the big daddy of clearing larger tires. This means that you can hit the biggest bumps or holes, as fast as you like at whatever steering angle you like, and you won’t rub your tires ever. Go ahead, jump your truck, or flex it out, no problems.
This is for the people who are serious about off-roading and pushing their vehicles as hard as they can, using the full amount of suspension travel available to them.
Caveats
Before I get into the guide, I want to clarify one more thing. I am talking about fitting tires with a standard bolt in suspension kit, which means no drop bracket kits. Drop bracket kits move the suspension pivot points and change the geometry. A drop bracket lift will make fitting larger tires easier as far as body clearance goes, but they are not very good for offroad, as they are weaker, don’t improve ground clearance, and raise your center of gravity. This guide will be completely centered around bolt-in suspension kits, however, it may also apply to many long travel kits, though these kits may require some additional work to make 35’s fit because they usually allow additional up-travel.
So with all of this in mind, I’m going to walk you through all of the ins and outs of clearing your 35’s at each clearance level. This is going to be a comprehensive guide and will give you different options for each clearance level. If you want, you can skip ahead to the clearance level you’re looking for. I will also include a list of terms and definitions at the end of the article, so if you come across a word or term you aren’t familiar with, check there.
35" Street Clearance Fitment
So we will start with the easiest clearance level: The street. This will allow you to drive around town without rubbing, unless you hit a particularly aggressive speed bump or curve.
The biggest challenges when clearing tires at ride height are going to be clearance at the cab mount, lower firewall, frame, and upper control arm.
Factors
There are several factors that will make a big difference about how easy or difficult it is to clear 35’s at this level:
- Wheel width/size
- Wheel offset
- Tire width
- Tire tread (A/T vs M/T)
- Suspension Lift or ride height.
- Alignment
When you are just trying to clear your tires for the street, each of those factors will make a big difference to how much needs to be done to be able to turn your wheels lock to lock.
Wheel width and offset are going to have big impacts on your scrub radius. The wider your wheel, and the more it pokes out, the more clearancing will be required to steer. As scrub radius increases, the wheel is pushed further out, which brings it closer to the firewall and front of the wheel well as you turn. However, if you choose a wheel without enough offset, the tire will be too close to the UCA and might even rub on the frame.
Tire width/size/tread is an obvious one. The wider and taller the tire it is, the harder it will be to clear. A 35x11.5” tire will be easier to clear than a 35x12.5” tire. Tread also affects the size, as more aggressive mud tires usually have a more square profile, and larger side lugs which can lead to rubbing. Most tire companies seem to use a different measuring tape, as it is very rare to find a tire that actually measures out to it’s rated size. A 35” tire is typically closer to 34.5” when fully inflated. A 315/70R17 is basically the metric equivalent of a 35x12.5” tire. It is closer to 34.6” tall and 12.4” wide, but honestly, that’s around where a 35x12.5” will measure out to as well.
Your ride height is also going to have a large impact on how easy it is to clear your tires at this level. The higher you lift your truck, the easier it will be to clear the tires. However, the con is that your ride quality will get worse the higher you lift as well, as you are decreasing down travel, as well as typically running more preload or a stiffer spring to achieve that ride height. My personal recommendation is to keep your ride height between 1.5-2.5” of lift over stock height. This will give you the best balance of suspension performance and tire clearance, as well as keep your COG lower.
Your alignment is able to affect tire clearance by moving the LCA forward or back. The hardest place to get clearance is at the cab mount and firewall, so you can use your alignment to move the tire forward by close to .75”. The problem with maxing out your caster at the LCA is you are twisting the rubber bushings in a way that they weren’t really designed for, and it can wear them out quicker. If you are mostly just driving your truck on the street though, this shouldn’t be too big of an issue.
 What to do
So to get your 35” tires to clear for the street, I would suggest choosing a wheel with a moderate offset, around -12 to -18 should work well. This pushes the wheel away from the UCA and frame, without getting too extreme and causing issues elsewhere.
From there, use a suspension lift of some sort, and increase your ride height by around 2-2.5”. This will give you a bit more room at ride height to steer, as well as give a bit more up-travel before you rub.
Once the suspension has been installed and ride height set, you’ll want to make sure your alignment is pushed as far forward as possible, without compromising camber.
Next up is cutting. For a street level clearance, you will need to get creative with cutting the front plastic and wheel well liner. A viper cut is an easy way to get the front bumper out of the way. If you already have an aftermarket front bumper you won’t need to worry about it.
At the cab mount, depending on your specific wheel/tire combo, and how much you are able to push your wheel forward, you may be able to get away with a simple aggressive cab mount chop. However, in my experience, this is not very likely, or you will find yourself rubbing the cab mount even over minor bumps while turning. The best way to make sure that the tires clear is to do a cab mount relocation. This is a kit that moves the entire cab mount back on the frame, leaving you with a lot more room than even the most aggressive CMC.
Hammering your pinch weld on the firewall back is a must. My favourite way to do this, is to take a sledge and just hit it towards the outside of the vehicle. Some people like to cut slots into the pinch weld, hammer it over, and then use a seam sealer. I’ve never found the pinch weld to be so hard to bend that cutting it was necessary.
Your fenders and flares will need to be cut in the rear lower section. Here, you can get your vehicle sitting on the ground so you know where ride height is at, and turn the wheels back and forth, cutting the body back until you can turn fully, lock to lock, in both directions without rubbing.
That is basically all you need to do to clear the tires for driving around the street. I would recommend putting sizeable spacers behind the bump stops to prevent your tire from going too high in the event that you do hit a speed bump too aggressively.
What to expect
Don’t expect to never rub on the street, as there are lots of different situations that will compress your suspension while turning, such as turning into driveways, or hitting speed bumps, and dips in the road. This is just the minimum clearance level to be able to drive around without being embarrassed every time you turn a corner.
35" Dirt Road Clearance Fitment
This is probably the most common level of clearance that people do and spout online about how they fully clear 35’s and never rub. The fact is, if this is all you do, you are still going to rub in several places when you push your truck a bit harder. In my opinion, if you aren’t pushing 35’s to the point where they are rubbing with this amount of clearancing, you probably don’t need 35’s in the first place. Harsh, I know.
Regardless, this is what most shops and people will be pushing as “fully cleared”, despite only really being cleared for around 85% of the available wheel travel. There are a couple different routes you can go to get enough clearance to drive moderate dirt roads and obstacles, so I’ll go over those here.
 Factors
At this level of clearance, the factors that affect the tires fitting properly mostly stay the same as the street level clearance; Wheel and tire specifications are going to be a big part of it. One thing that does change is lift height. When you start making extra room, the lift height doesn’t make as much difference. Your tires should only rub in the last 15% of wheel travel, which means that you can run less lift, and still clear, you’ll just have a bit less up travel before your tires hit the wheel well.
Your fenders and flares are also going to become a problem if you want to drive on dirt. They simply aren’t big enough to fit a 35” tire, and if they aren’t cut back, the flares will pop off, and the fenders will get bent. The problem with cutting the fenders and flares back is that the wheel well liner loses all of its mounting points. This will allow dirt and water to spray all over inside of your wheel wells, and you will get a lot more dirt into your door hinges and engine bay.
The main issue with this though, is that your engine’s air intake is in the wheel well. Usually it is protected by the wheel well liner, but with that removed, it is left completely exposed.
What to do
As I mentioned, there are a couple of ways to go about clearing 35’s for dirt roads. However, no matter which way you go, you will have to cut your fenders and flares back. The amount you need to cut will depend on if you are in a 2nd or 3rd generation Tacoma. A 2005-2015 Tacoma is usually best to cut around 1.5-1.75” out of the fenders and flares, a 2016-2023 Tacoma needs 1.25” cut out.
Once you have cut out your fenders, you’ll find that you can no longer reinstall your wheel well liners. If you never drive through water, you can likely get away with just replacing your filter more often. However, if you live in an area with lots of water and mud, you are going to want to do something about it. To solve this issue, you can do one of the following things: relocated your intake with something like a snorkel. Even a cold air intake setup that moves the intake into the engine bay will be better than nothing. The other option is to replace the wheel well liner with something else, such as the C4 Fabrication Over Size Tire Fitment Kit.
I would also recommend some small bump stop spacers to keep your tires from smashing the wheel wells too hard, especially during hard impacts or g-outs. This will limit your up travel instead of your tire and wheel well limiting it for you.
Beyond cutting the fenders and dealing with your air intake, here are the different ways you can clear your 35’s.
Option 1
The first way to get your 35’s cleared for most driving is to do some gentle persuasion. Try asking your wheel wells nicely if they could kindly get out of the way. If that doesn’t work, you can grab a giant sledgehammer and go for a more “brute force” method. Hammer the firewall back as much as you can. Depending on your wheel/tire specs, and alignment, you might juuuuuust get enough clearance at the firewall. You can go along the top of the wheel well and hammer it back as well, especially below the battery and washer fluid reservoir. I would recommend unbolting the reservoir before hammering, as you are likely to break the tabs that hold it in place. Post hammering, it may not fit back in properly anymore either.
Of course it goes without saying that a cab mount relocation also needs to be done. Even the most aggressive cab mount chop will still end up rubbing at full turn.
Hammering the firewall and wheel well will only give so much space before you actually start tearing the sheet metal though, and it won’t be enough for many wheel/tire combos out there. It’s also possible to get a couple leaks into your cab if any of the seams open up, or any tears happen. Using an automotive seam sealer can fix that problem.
Option 2
The second option is very similar to the hammer method, but instead of smashing the firewall back, you cut out the sheet metal, and weld new plates back in. This is called tubbing. To clear a 35 for normal dirt roads, you can get away with a pretty minor tub job at the bottom of the fire wall. Of course you will still need a cab mount relocation done.
Option 3
The third, and in my opinion best, option is to use the JD Fabrication lower pivot relocation kit. This kit allows you to move the entire lower control arm forward up to 1.25” in .25” increments. This gets you the space required to clear the firewall without any tubbing or hammering other than the pinchweld. You don’t even need to do a cab mount relocation, and can get away with a simple cab mount chop, unless you have an extremely aggressive wheel offset in the front.
This kit does a lot more than let you fit 35’s without tubbing the firewall though. It also replaces the weak lower pivot mounts and cam tabs with beefy .25” steel, so the front of your truck is much much stronger. Not only that, but the kit has a skid plate built into it that adds 2” of additional ground clearance under the engine compared to any bolt on skid plate set. If you’re into wheeling, you know that this is huge! It’s the same ground clearance gain as bolting 4” larger tires on your truck!
Of course, this kit comes with an additional cost, not only for the kit itself, but the labour to install it if you aren’t confident doing all of the cutting, grinding and welding yourself, because it is a lot! I believe it is well worth it though, even for mild offroading, because the upgraded strength and clearance will always be welcome.
What to expect
After all this work, you can expect to drive regular dirt roads without any rubbing. If you end up hitting an aggressive g-out, big bump, or a very articulated obstacle, rubbing is still extremely likely. Usually along the top of the wheel well, especially the area just behind the headlights. You may also rub the end caps of your front bumper if you have an aftermarket bumper that doesn’t compensate for larger rubber.
35" Full Clearance Fitment
You won’t know how amazing it is to drive wherever you want, as hard as you want, without ever even thinking about tire rub, until you’ve experienced it. Getting into a tough obstacle with the suspension fully articulated and your big 35’s stuffed into the wheel wells, then turning the wheel full lock to find traction, and never hearing the sound of rubber on metal is awesome. Or deciding to take your truck off a sweet jump, landing hard, and driving away like a boss without a single brrraaaapppp. It makes you feel like your truck is purpose built for this sort of thing, and that’s because it is. It is definitely a lot more work than what most people are willing to do, but it’s well worth it if you’re serious about off-roading.
Factors
When you’re fully clearancing 35’s on your truck, a lot of the factors that affect the other levels of clearance don’t really come into play. It doesn’t matter what height you set your suspension lift at, because the tires aren’t going to rub at any lift height. You could even lower your truck and they will still clear.
For your wheels, you don’t have to worry about having an offset that is too aggressive. The only thing you need to think about is making sure your wheels give enough space to the frame and UCA. As long as that is okay, you can go with any wheel you like, even if you like a lot of wheel poke.
One thing you’re going to want to take into consideration at this point is frame flex. The Tacoma frame is not especially well known for it’s strength, and you would be shocked at just how much the frame actually flexes when driving offroad. When you cycle your suspension to see where the travel limit is, you can expect another 1.5” of movement just in the frame flex on hard impacts. Keep that in mind, because you don’t want to go through all of the effort and expense of getting your tires to fully clear, only for them to just rub under heavy compression.
For your bump stops, you can usually actually move your bump stops up a little bit, and gain a little bit of travel, depending on your suspension setup. You do need to watch out for your UCA contacting the inside of the wheel well, which can happen when going hard.
What to do
Again, there are a couple of options you can choose between to get 35’s to fully clear on your truck. Once again though, no matter which way you choose, you will need to cut out your fenders and flares. The same measurements as before should still work, but you can verify while doing the rest of the clearancing, and making adjustments as required. You will also still need to take care of your air intake as mentioned before.
To do this properly, the best way is to pull the coil off of your front shock, and remove your bump stops. This will allow you to jack up and turn your wheels fully in any direction and figure out exactly where the tire is going to hit. One thing I noticed having done this many times, is that you find a limiting point, cut it out, and think you’re done, only to then have the wheel move up even further and hit another area. You always end up needing to cut way more than you originally think!
Option 1
The first option is similar to before with the tubbing. Once a cab mount relocation is complete, and you are able to cycle the suspension, you can start cutting out the firewall and wheel well as much as needed until the tire can be completely bottomed out at mechanical bind, and still turn the wheels completely in both directions. I usually then cut back another inch or so to compensate for frame flex. You don’t want to actually drive your truck with it able to hit mechanical bind, the idea is to setup your bump stops before mechanical bind occurs to save all of your parts. However, it can still happen, or your bump stops can fail, so it’s good to clearance as far as the wheel can physically go, plus enough to make up for frame flex.
Once you’ve cut back far enough that you are confident that the tire could never make contact, it’s time to weld in new sheet metal. You’re going to end up tubbing not only the firewall, but the wheel well too. This usually means something is going to need to be relocated, typically the washer fluid reservoir. You can kind of zap strap it in place, or you can replace it with a smaller container that fits in the area.
Option 2
The second option is basically a combination of using the JD pivot kit to avoid tubbing the firewall. You are basically trading not having to tube the firewall (which really sucks to do honestly) with doing the JD kit instead. You would still need to do some tubbing in the wheel well below the batter/washer fluid reservoir, as well as a cab mount chop.
The JD lower pivot kit still has all the same benefits as mentioned previously, by increasing ground clearance around 2”, and being substantially stronger than the stock pivot points.
What to expect
Yeah, it’s a lot of work to do correctly, but once it’s done, you never have to worry about tire clearance again, which is such a great feeling. You would be amazed at how much the Tacoma frame flexes under hard impacts, so clearancing well beyond the limitations of the suspension itself is necessary to have a truly rub-free experience on any terrain. It’s hard to describe how confidence inspiring it is to drive your truck hard off-road, and never hear rubbing; it really makes a big difference to the experience.
Additional 35" Tire Fitment Recommendations
Of course installing 35” tires on your truck doesn’t just end at making them fit. There are a host of other considerations to take into account as well. Things like drivability, wear & tear, and strength are big factors, as adding larger tires increases the strain on the rest of your factory components. There are a few upgrades that I wouldn’t suggest doing 35’s without, and then a few others that may depend more on your driving style.
 Gearing
So a big one that most people will ask is about gearing the differentials for 35’s. Larger tires will add rolling mass and change the gear reduction that your vehicle’s engine and transmission were designed around. The effect is the truck feeling sluggish and like it lacks power. The transmission and torque converter will also be struggling more to spin the larger tires, which leads to more heat build up. This can be somewhat compensated for by changing the differential gear ratio.
I would recommend any 2016-2023 Tacoma to go to a 5.29 gear ratio. The stock gearing is already a little bit too high, so this makes up for it and will make the truck drive much better.
For the older 2005-2015 Tacoma, I would recommend a 4.88 ratio. You can go 4.56, but I personally find that 4.88’s drive much better, and the fuel economy is essentially the same between the two.
Your transmission does have an effect on what each ratio will feel like, as the gearing between the manual and auto is different, but I still feel as though these ratios are the best fit for either transmission.
When re-gearing your differentials, this is also the perfect opportunity to add front and rear lockers to your truck, which completely changes the capabilities of your truck offroad. You will be able to crawl up obstacles with ease that were impossible before. Especially when combined with a 35” tire.
Strength Reinforcements & Gusseting
With a larger tire comes more weight, and more leverage, which cause extra stress on the stock suspension components. Cam tabs, spindles, and shock buckets are all common failure points when running 35” tires. Here I will list out all of the modifications I would strongly recommend when going to 35s.
Spindle Gussets
The stock spindles are especially weak on the Tacoma and 4Runner, and I would almost suggest this being a mandatory mod for 35’s, considering how easy they are to bend even with a 33” tire.
Cam Tabs
The cam tabs are another weak point of the Toyota suspension set up. If you installed the JD pivot kit, then you don’t have to worry about this, but if you decided to go a different route, then you’ll want to reinforce the cam tabs another way. I wrote a separate article on this specific issue.
UCA/Shock Tower
UCA gussets are a very beneficial mod when running your truck harder, especially with 35’s. They double shear the ends of the massive UCA bolt, which drastically strengthens it, while also helping to reduce just how much the coil bucket flexes on impacts. It can’t completely eliminate it, but it does help a lot.
Lower Pivot Mounts
Again, if you decided to go with the JD lower pivot kit, you don’t need to worry about this, but if not, then the lower pivot mounts have been known to crack and tear under heavy abuse. The JD kit replaces these mounts entirely, but there are other kits out there that are designed to reinforce them.
Steering
Steering is such a crucial component of your truck, as well as one of the parts that takes the most abuse from running a truck hard with large tires, that it gets it’s own section. Blowing steering racks is common on Tacomas and 4Runners, but when you throw big 35’s on, it becomes inevitable. There are a few ways to deal with this when it eventually becomes an issue.
 Get really good at swapping racks
The first way is to just get really good at swapping racks, which is a big pain in the butt.
Tundra Rack Swap
The Tundra rack swap is probably the best way to take care of the steering issues. A couple companies, such as Basikbiker, offer modified Tundra racks that can be installed instead of the OE Tacoma one. It is substantially stronger and can take a lot more abuse without blowing.
Slide Rack
JD Fabrication also makes a slide rack setup for the stock steering rack, that reinforces the OE rack with some modifications. It is a good product that adds a lot of strength, but it doesn’t allow you to run rack boots, so if you drive in muddy or wet conditions a lot, then this is not necessarily the best option for you.
Tie Rods
Your tie rods also become a weak link in the steering system. They can be upgraded in many ways, from tie rod sleeves made by W.A.R. Fab, to fully machined and heimed tie-rods. They can also be reinforced with double shear gussets at the spindle for added strength there.
Brakes
Many people go for the big, visible upgrades that help them get up obstacles and drive faster, but many people don’t consider what all of the additional weight and speed do to your braking system. Big brake kits are definitely a valuable upgrade when your truck starts having a lot more mass and big tire leverage to keep it from stopping quickly. Upgrading your brakes to handle more heat and have more braking power is an important part of starting to drive your truck harder!
Conclusion
Hopefully this was a helpful article for you to make a realistic decision on whether 35’s are right for you, as well as how far you want to go when it comes to making them clear. I always suggest getting the most out of whatever modifications you do, which means fully clearancing everything every time. However, I also understand that not everybody uses their truck as hard as I do, or has the same feelings about what is really required for their driving style or terrain. That’s why I wanted to go through each “clearance level” and give a realistic expectation on what the limitations for each setup would be.
I also wanted to help clear the air, because I have seen many customers come to us asking us to clear 35’s for them, and then tell us how so-and-so shop does it easily, and wonder why it takes so much more work for us to do it. That’s because our definitions of “fully cleared” are very different based on our hands-on experience of taking the Tacoma platform to the very limit.
If you are interested in having 35’s, or really any oversized tire, installed on your Toyota, feel free to reach out to us and have a discussion about what level of clearance and supporting upgrades is right for you. We can also get you booked into our shop to get the work done, and have you out on the trails with confidence.
 Terms & Definitions
- Bind - When two immovable objects meet and don’t allow any further articulation. Typically when a ball joint or other is maxed out.
- Bump - When the suspension is fully compressed and hitting the bump stops.
- Cab Mount - A mount on the frame that the cab or body of the vehicle is bolted to. Can also be referred to as a Body Mount.
- Camber - The amount the top of your wheels are tipped in or out from the front of the vehicle.
- Castor - The distance between the center point on the ground created by drawing a straight line from the upper ball joint through the lower ball joint, and the center of the tire contact patch on the ground from front of vehicle to rear of vehicle.
- CMC - Cab Mount Chop - When the front cab mount is cut back and a new plate is welded in to create extra clearance. May also be referred to as a BMC or Body Mount Chop.
- CMR - Cab Mount Relocation - When the entire front cab mount is cut off of the frame and replaced with a new mount further back to great a lot of extra clearance. May also be referred to as a BMR or Body Mount Relocation.
- COG - Center Of Gravity; The point from the ground that the vehicle will roll or tip over at.
- Cycle the Suspension - Move the suspension all the way up and down.
- Down Travel - The amount of suspension travel from ride height to full extension or top out.
- Droop - when the suspension is fully extended.
- Firewall - The sheet metal body between the engine compartment and the cab of the vehicle.
- LCA - Lower control arm; a component of the front suspension
- Lock to Lock - Turning your wheels from all the way left to all the way right or vice versa.
- Poke - How far the wheel sticks out past the fenders of the vehicle.
- Ride Height - The height your vehicle sits at on level ground.
- Scrub radius - the distance between the steering center point on the ground created by drawing a straight line from the upper ball joint through the lower ball joint, and the center of the tire contact patch on the ground from center of vehicle to outside of vehicle.
- Steering Angle - How far you can turn your wheels from straight in either direction
- Toe - The amount the front of your wheels are pointed in or out compared to each other.
- Travel - How much suspension movement is possible from full extension to full compression.
- Tub (tubbing) - cutting out the stock sheet metal, and replacing it with new sheet metal further back to create more clearance.
- UCA - Upper control arm; a component of the front suspension
- Up Travel - The amount of suspension travel from ride height to full compression or bottom out.
- Wheel well - The area where the wheel is free to move.


1 comment
This guide offers a practical breakdown of how to fit 35″ tires on trucks like Tacomas and 4Runners, explaining different levels of clearance — from street-friendly fitment to full off-road clearance — and the modifications needed (like suspension lift, cab mount relocation, and cutting fenders) to avoid rubbing and maximize performance.